
"In 2024, From Cameras to OBS A Step-by-Step Mac & PC Broadcast Setup"
From Cameras to OBS: A Step-by-Step Mac & PC Broadcast Setup
How to live stream facebook from PC, Mac or Laptop with OBS

Richard Bennett
Mar 27, 2024• Proven solutions
Here is the step by step guide to go live from PC to facebook with OBS
If you are using wirecast check this article >>
- Part1.Setting the OBS Scenes
- Part2.Stream setting according to Facebook
- Part3.Preview and Test your before go live
- Part4.Video tutorial
A. Setting the OBS Scenes
Step 1: Make your scenes perfectly ready before starting the actual streaming process.
 Software Update Pro - Check and update software installed on your computer.
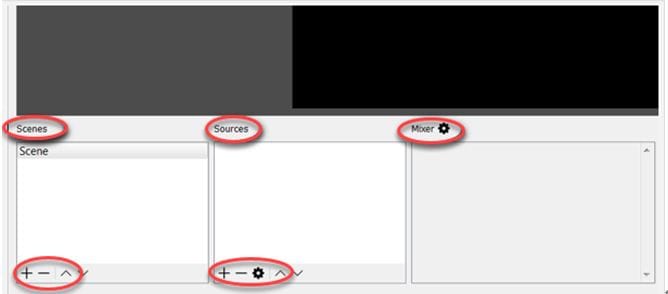
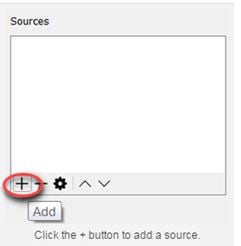
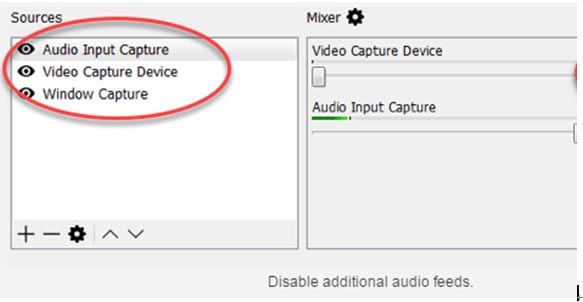
Step 2: Now you need to add sources to the scenes.

Step 3: It is possible to include windows capture, audio input and webcam as per need.
 vMix 4K - Software based live production. vMix 4K includes everything in vMix HD plus 4K support, PTZ control, External/Fullscreen output, 4 Virtual Outputs, 1 Replay, 4 vMix Call, and 2 Recorders.
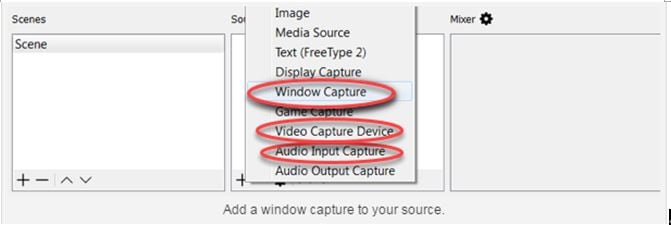
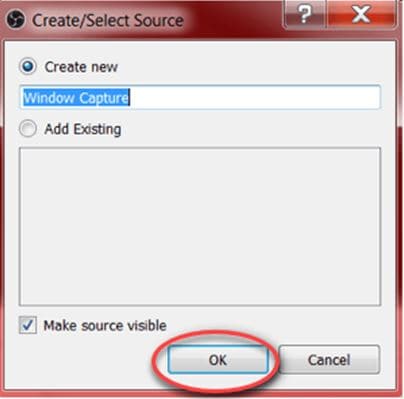
Step 4: Prefer to use default settings for source and then press OK.
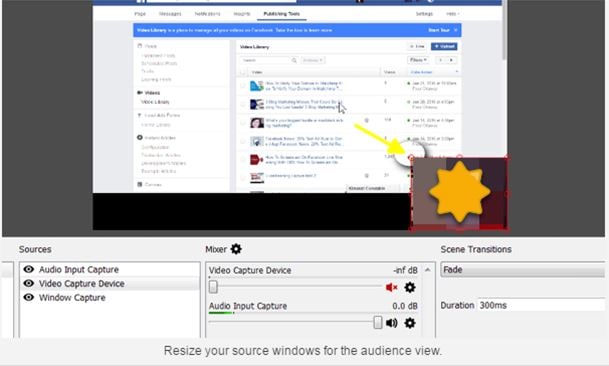
Step 5: Once you have done settings for all sources then they must be adjusted on screen in right order.
Step 6: You also need to arrange the capture size for your videos. Adjust the right video size.

B. Stream setting according to Facebook
Once you are done with Part A then it is time to follow the guidelines as below:
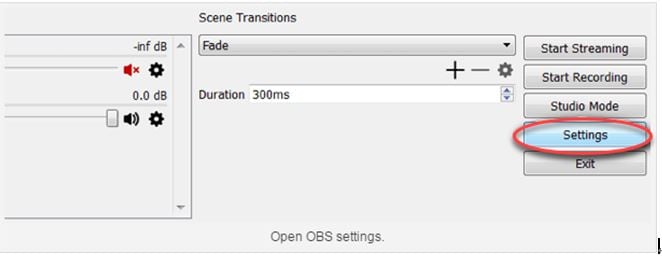
Step 1: First of all you need to go to the settings.
Step 2: Now adjust the bit rate, it must be kept below 4000 Kbps and then choose your preferred recording format.
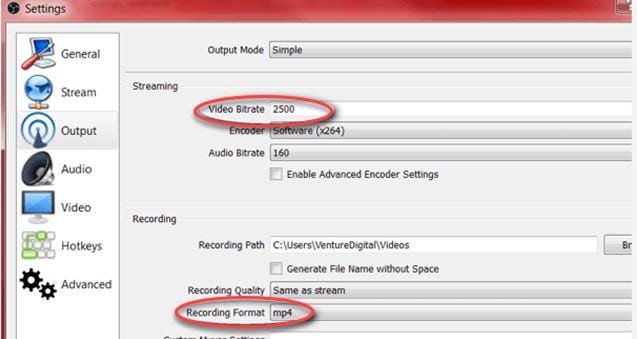
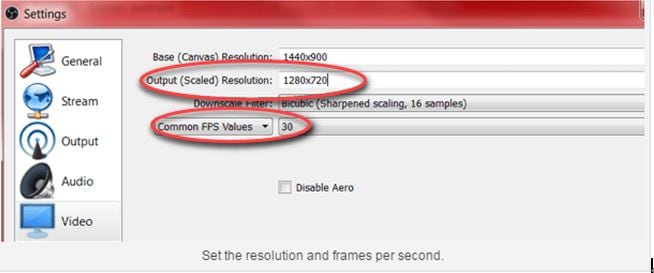
Step 3: Make settings for resolution as well as FPS. The desired maximum resolution level is 720p or 1280x720 whereas frame rate must be kept at 30 fps.
Step 4: Now you need to visit the facebook page and then click on the video, go to publishing tools and then from top right corner hit +Live option.

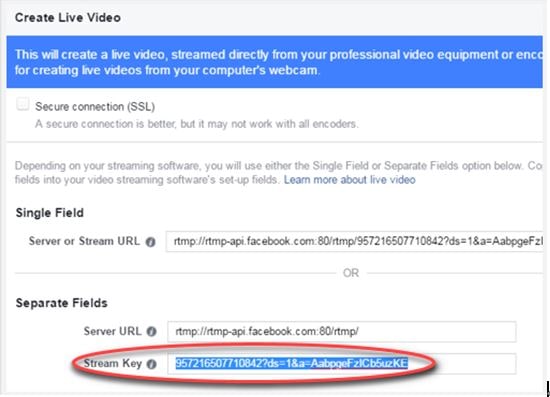
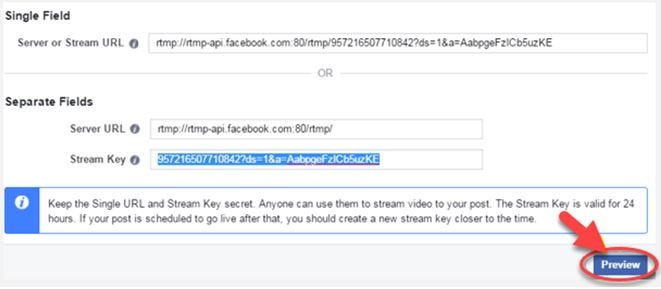
Step 5: It is time to move to the ‘create live video’ page. You have to copy the stream key from the specified location. Prefer to keep this page open.
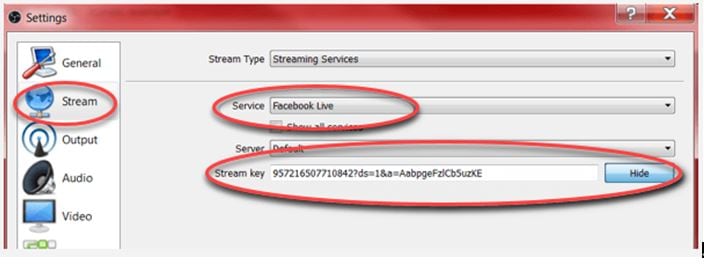
Step 6: Now come back to your OBS settings page and choose stream option. From list of services, prefer to choose Facebook Live option and then simply paste the stream key in the specified field on your screen.
C. Preview and Test your before go live
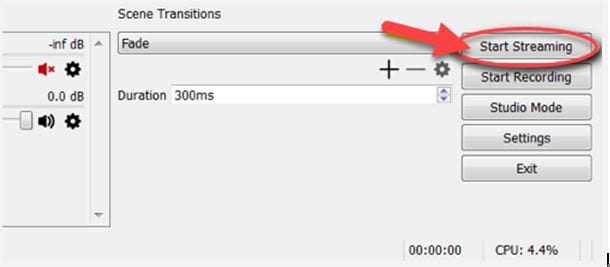
Step 1: It is time to hit the button “Start Streaming”.

Step 2: Now move back to your facebook page and then choose to preview.
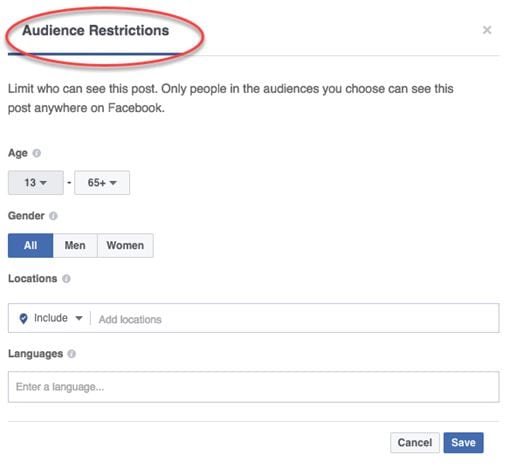
Step 3: It is time to add your title as per preferences, make selection for your targeted audience and once you have finished all settings and testing process then hit button “Go Live”.
 vMix Pro - Software based live production. vMix Pro includes everything in vMix 4K plus 8 channels of Replay and 8 vMix Call
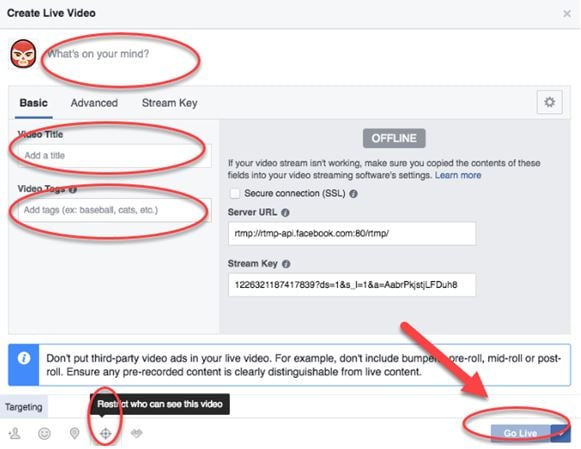
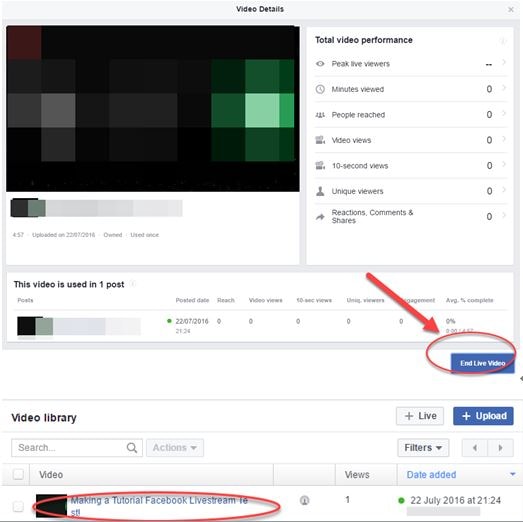
Step 4: Once your procedure for live streaming is complete then you are free to end the live video anytime over facebook page. The video will be automatically added to your Live video library and you can find it their anytime in future.
Step 5: This is all about how to live stream your videos over facebook directly from your computer. Hope you will enjoy streaming a new impressive video soon!
Video tutorial
Facebook stream parameter requirements
- 1. You need to adjust resolution for videos as 720p or simple 1280x720 and the frame rate must be maintained to 30fps. Or simple, one key frame within every two seconds.
- 2. It is important to transfer at least one key frame within every two seconds throught the whole streaming process.
- 3. Professionals recommend bit rate of 4000 Kbps for better results.
- 4. Maximum length supported for a live stream video is 4 hours. After every 240 hours, I is necessary to generate a fresh key frame.
- 5. The audio sample rate is required to be managed at 44.1 KHz.
- 6. Desired Audio Bit rate is 128 Kbps for stereo input.
- 7. The encoding bit rate must be kept as CBR in order to get best results.
Richard Bennett
Richard Bennett is a writer and a lover of all things video.
Follow @Richard Bennett
Richard Bennett
Mar 27, 2024• Proven solutions
Here is the step by step guide to go live from PC to facebook with OBS
If you are using wirecast check this article >>
- Part1.Setting the OBS Scenes
- Part2.Stream setting according to Facebook
- Part3.Preview and Test your before go live
- Part4.Video tutorial

Key features:
• Import from any devices and cams, including GoPro and drones. All formats supported. Сurrently the only free video editor that allows users to export in a new H265/HEVC codec, something essential for those working with 4K and HD.
• Everything for hassle-free basic editing: cut, crop and merge files, add titles and favorite music
• Visual effects, advanced color correction and trendy Instagram-like filters
• All multimedia processing done from one app: video editing capabilities reinforced by a video converter, a screen capture, a video capture, a disc burner and a YouTube uploader
• Non-linear editing: edit several files with simultaneously
• Easy export to social networks: special profiles for YouTube, Facebook, Vimeo, Twitter and Instagram
• High quality export – no conversion quality loss, double export speed even of HD files due to hardware acceleration
• Stabilization tool will turn shaky or jittery footage into a more stable video automatically.
• Essential toolset for professional video editing: blending modes, Mask tool, advanced multiple-color Chroma Key
A. Setting the OBS Scenes
Step 1: Make your scenes perfectly ready before starting the actual streaming process.
Step 2: Now you need to add sources to the scenes.
Step 3: It is possible to include windows capture, audio input and webcam as per need.
Step 4: Prefer to use default settings for source and then press OK.

Step 5: Once you have done settings for all sources then they must be adjusted on screen in right order.
Step 6: You also need to arrange the capture size for your videos. Adjust the right video size.
B. Stream setting according to Facebook
Once you are done with Part A then it is time to follow the guidelines as below:
Step 1: First of all you need to go to the settings.
Step 2: Now adjust the bit rate, it must be kept below 4000 Kbps and then choose your preferred recording format.
Step 3: Make settings for resolution as well as FPS. The desired maximum resolution level is 720p or 1280x720 whereas frame rate must be kept at 30 fps.
 PDF application, powered by AI-based OCR, for unified workflows with both digital and scanned documents.
Step 4: Now you need to visit the facebook page and then click on the video, go to publishing tools and then from top right corner hit +Live option.
Step 5: It is time to move to the ‘create live video’ page. You have to copy the stream key from the specified location. Prefer to keep this page open.
Step 6: Now come back to your OBS settings page and choose stream option. From list of services, prefer to choose Facebook Live option and then simply paste the stream key in the specified field on your screen.
 Lyric Video Creator Professional Version
C. Preview and Test your before go live
Step 1: It is time to hit the button “Start Streaming”.
Step 2: Now move back to your facebook page and then choose to preview.
Step 3: It is time to add your title as per preferences, make selection for your targeted audience and once you have finished all settings and testing process then hit button “Go Live”.
Step 4: Once your procedure for live streaming is complete then you are free to end the live video anytime over facebook page. The video will be automatically added to your Live video library and you can find it their anytime in future.
Step 5: This is all about how to live stream your videos over facebook directly from your computer. Hope you will enjoy streaming a new impressive video soon!
Video tutorial
Facebook stream parameter requirements
- 1. You need to adjust resolution for videos as 720p or simple 1280x720 and the frame rate must be maintained to 30fps. Or simple, one key frame within every two seconds.
- 2. It is important to transfer at least one key frame within every two seconds throught the whole streaming process.
- 3. Professionals recommend bit rate of 4000 Kbps for better results.
- 4. Maximum length supported for a live stream video is 4 hours. After every 240 hours, I is necessary to generate a fresh key frame.
- 5. The audio sample rate is required to be managed at 44.1 KHz.
- 6. Desired Audio Bit rate is 128 Kbps for stereo input.
- 7. The encoding bit rate must be kept as CBR in order to get best results.
Richard Bennett
Richard Bennett is a writer and a lover of all things video.
Follow @Richard Bennett
Richard Bennett
Mar 27, 2024• Proven solutions
Here is the step by step guide to go live from PC to facebook with OBS
If you are using wirecast check this article >>
- Part1.Setting the OBS Scenes
- Part2.Stream setting according to Facebook
- Part3.Preview and Test your before go live
- Part4.Video tutorial
A. Setting the OBS Scenes
Step 1: Make your scenes perfectly ready before starting the actual streaming process.
Step 2: Now you need to add sources to the scenes.
 Glarysoft File Recovery Pro Annually - Helps to recover your lost file/data, even permanently deleted data.
Step 3: It is possible to include windows capture, audio input and webcam as per need.
Step 4: Prefer to use default settings for source and then press OK.


Step 5: Once you have done settings for all sources then they must be adjusted on screen in right order.
Step 6: You also need to arrange the capture size for your videos. Adjust the right video size.
B. Stream setting according to Facebook
Once you are done with Part A then it is time to follow the guidelines as below:
Step 1: First of all you need to go to the settings.
Step 2: Now adjust the bit rate, it must be kept below 4000 Kbps and then choose your preferred recording format.
Step 3: Make settings for resolution as well as FPS. The desired maximum resolution level is 720p or 1280x720 whereas frame rate must be kept at 30 fps.

Step 4: Now you need to visit the facebook page and then click on the video, go to publishing tools and then from top right corner hit +Live option.
 DLNow Video Downloader
Step 5: It is time to move to the ‘create live video’ page. You have to copy the stream key from the specified location. Prefer to keep this page open.
 PCDJ DEX 3 for Windows & MAC is the total entertainment DJ software solution, offering audio, video, and karaoke mixing ability. Automatic beat-sync, smart looping, 4 decks, DJ MIDI controller support, Karaoke Streaming and much more.
Step 6: Now come back to your OBS settings page and choose stream option. From list of services, prefer to choose Facebook Live option and then simply paste the stream key in the specified field on your screen.
C. Preview and Test your before go live
Step 1: It is time to hit the button “Start Streaming”.
Step 2: Now move back to your facebook page and then choose to preview.
Step 3: It is time to add your title as per preferences, make selection for your targeted audience and once you have finished all settings and testing process then hit button “Go Live”.
Step 4: Once your procedure for live streaming is complete then you are free to end the live video anytime over facebook page. The video will be automatically added to your Live video library and you can find it their anytime in future.
Step 5: This is all about how to live stream your videos over facebook directly from your computer. Hope you will enjoy streaming a new impressive video soon!
Video tutorial
Facebook stream parameter requirements
- 1. You need to adjust resolution for videos as 720p or simple 1280x720 and the frame rate must be maintained to 30fps. Or simple, one key frame within every two seconds.
- 2. It is important to transfer at least one key frame within every two seconds throught the whole streaming process.
- 3. Professionals recommend bit rate of 4000 Kbps for better results.
- 4. Maximum length supported for a live stream video is 4 hours. After every 240 hours, I is necessary to generate a fresh key frame.
- 5. The audio sample rate is required to be managed at 44.1 KHz.
- 6. Desired Audio Bit rate is 128 Kbps for stereo input.
- 7. The encoding bit rate must be kept as CBR in order to get best results.
Richard Bennett
Richard Bennett is a writer and a lover of all things video.
Follow @Richard Bennett
Richard Bennett
Mar 27, 2024• Proven solutions
Here is the step by step guide to go live from PC to facebook with OBS
If you are using wirecast check this article >>
- Part1.Setting the OBS Scenes
- Part2.Stream setting according to Facebook
- Part3.Preview and Test your before go live
- Part4.Video tutorial
 vMix HD - Software based live production. vMix HD includes everything in vMix Basic HD plus 1000 inputs, Video List, 4 Overlay Channels, and 1 vMix Call
A. Setting the OBS Scenes
Step 1: Make your scenes perfectly ready before starting the actual streaming process.
Step 2: Now you need to add sources to the scenes.
Step 3: It is possible to include windows capture, audio input and webcam as per need.
Step 4: Prefer to use default settings for source and then press OK.

Step 5: Once you have done settings for all sources then they must be adjusted on screen in right order.
Step 6: You also need to arrange the capture size for your videos. Adjust the right video size.
B. Stream setting according to Facebook
Once you are done with Part A then it is time to follow the guidelines as below:
Step 1: First of all you need to go to the settings.
Step 2: Now adjust the bit rate, it must be kept below 4000 Kbps and then choose your preferred recording format.
Step 3: Make settings for resolution as well as FPS. The desired maximum resolution level is 720p or 1280x720 whereas frame rate must be kept at 30 fps.
Step 4: Now you need to visit the facebook page and then click on the video, go to publishing tools and then from top right corner hit +Live option.
Step 5: It is time to move to the ‘create live video’ page. You have to copy the stream key from the specified location. Prefer to keep this page open.
Step 6: Now come back to your OBS settings page and choose stream option. From list of services, prefer to choose Facebook Live option and then simply paste the stream key in the specified field on your screen.
C. Preview and Test your before go live
Step 1: It is time to hit the button “Start Streaming”.
Step 2: Now move back to your facebook page and then choose to preview.
Step 3: It is time to add your title as per preferences, make selection for your targeted audience and once you have finished all settings and testing process then hit button “Go Live”.

Step 4: Once your procedure for live streaming is complete then you are free to end the live video anytime over facebook page. The video will be automatically added to your Live video library and you can find it their anytime in future.
 KoolReport Pro is an advanced solution for creating data reports and dashboards in PHP. Equipped with all extended packages , KoolReport Pro is able to connect to various datasources, perform advanced data analysis, construct stunning charts and graphs and export your beautiful work to PDF, Excel, JPG or other formats. Plus, it includes powerful built-in reports such as pivot report and drill-down report which will save your time in building ones.
 It will help you to write dynamic data reports easily, to construct intuitive dashboards or to build a whole business intelligence cockpit.
KoolReport Pro package goes with Full Source Code, Royal Free, ONE (1) Year Priority Support, ONE (1) Year Free Upgrade and 30-Days Money Back Guarantee.
Developer License allows Single Developer to create Unlimited Reports, deploy on Unlimited Servers and able deliver the work to Unlimited Clients.
Step 5: This is all about how to live stream your videos over facebook directly from your computer. Hope you will enjoy streaming a new impressive video soon!
 PCDJ Karaoki is the complete professional karaoke software designed for KJs and karaoke venues. Karaoki includes an advanced automatic singer rotation list with singer history, key control, news ticker, next singers screen, a song book exporter and printer, a jukebox background music player and many other features designed so you can host karaoke shows faster and easier!
Video tutorial

Facebook stream parameter requirements
- 1. You need to adjust resolution for videos as 720p or simple 1280x720 and the frame rate must be maintained to 30fps. Or simple, one key frame within every two seconds.
- 2. It is important to transfer at least one key frame within every two seconds throught the whole streaming process.
- 3. Professionals recommend bit rate of 4000 Kbps for better results.
- 4. Maximum length supported for a live stream video is 4 hours. After every 240 hours, I is necessary to generate a fresh key frame.
- 5. The audio sample rate is required to be managed at 44.1 KHz.
- 6. Desired Audio Bit rate is 128 Kbps for stereo input.
- 7. The encoding bit rate must be kept as CBR in order to get best results.
 dotConnect for Oracle is an ADO.NET data provider for Oracle with Entity Framework Support.
Richard Bennett
Richard Bennett is a writer and a lover of all things video.
Follow @Richard Bennett
- Title: In 2024, From Cameras to OBS A Step-by-Step Mac & PC Broadcast Setup
- Author: Robert
- Created at : 2024-07-23 20:01:05
- Updated at : 2024-07-24 20:01:05
- Link: https://facebook-video-content.techidaily.com/in-2024-from-cameras-to-obs-a-step-by-step-mac-and-pc-broadcast-setup/
- License: This work is licensed under CC BY-NC-SA 4.0.