
Transforming Passive Browsing Into Active Participation on FB
Transforming Passive Browsing Into Active Participation on FB
Facebook Video Editor - Wondershare Filmora
Provide abundant video effects - A creative video editor
Powerful color correction and grading
Detailed tutorials provided by the official channel
In today’s time, live streaming has become quite popular for gamers and influencers. The reason behind it can be high interaction and engagement. One of the primary platforms to live stream your content is through Facebook.
It’s easy, quick, and connects with a mass of followers. However, if you do not know the process of how to go live on the Facebook page, then stay put. As in this guide, we will mention the correct steps. So, let’s begin:

In this article
Part 1: How to Schedule a Facebook Live?
Part 2: How to Go Live on Facebook Business Page?
Part 3: How to Go Live in a Facebook Group?
Part 1: How to Schedule a Facebook Live?
Scheduling a live video is where you plan a live stream on a particular time slot. Keep note that live video scheduling is only possible through a PC. You will also have to use the Google Chrome web browser for the same. Now that you know the pre-requisites, let’s comprehend the process in detail.
- To schedule a live video, click on the “What’s on your mind?” option. It’s situated just above the News Feed.
- Following that, click on the Live video option.
- Now, click on the “Schedule live video event” option. It’s present in the left column.
- Within the left column, choose the location where you want to stream your live video. You will get options like timeline, page, or group. If you want to upload a live video on your timeline, select the same. Likewise, for a group or page, select the options accordingly.
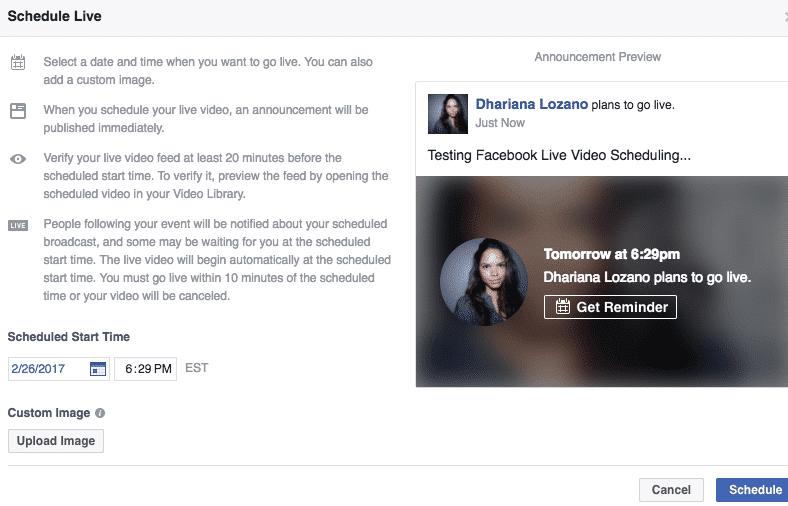
- Assign a name to the event. Also, choose other details like the date and time for your live streaming. After that, select the privacy setting for your live stream.
- Click on Next. To add pictures to your live video announcement, click on “Upload Cover Photo” or “Choose illustration”. Likewise, a default image will be selected if you do not want a special picture as your cover photo.
- Once done, click on the Create Event button. This is present on the bottom side of the left corner. Your live stream will be scheduled.
Once you schedule a live video, two posts will be generated automatically. This includes an announcement post and the live video post. The announcement post features all the information of the upcoming live stream. On the other hand, the live video post ensures that a live post is shared as per the scheduled date and time.
Part 2: How to Go Live on Facebook Business Page?
To ensure better connectivity and interaction with your followers, you may also require to go live through your Facebook business page. In that case, we will mention two ways to do so. While the first method involves live streaming through a Facebook mobile app, the second one includes live streaming through PC. Let’s check out both the process in detail:
Through Facebook Mobile App
Make sure you have downloaded the Facebook page mobile application to go live through your phone. For that, you can go to the App Store and search for the Facebook mobile application. Then, download and install the app.
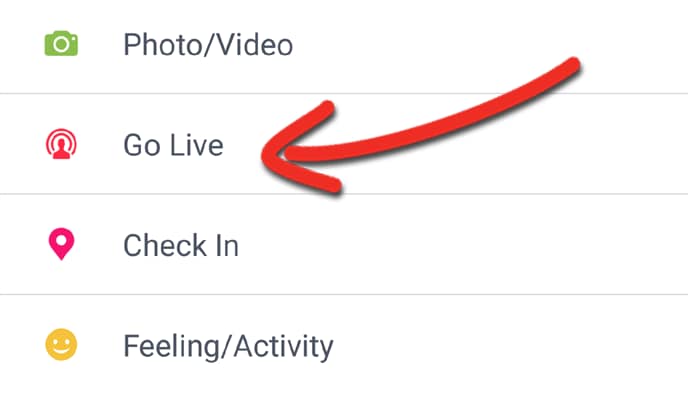
- Go to the Business page and click on Publish. This is more or less similar to how you update your status.
- In doing so, the post window will launch. Look at the “Live Video” option situated at the bottom side. You can recognize it with the red camera icon.
- Once the Facebook permission prompts (for camera and microphone) appear, click on OK.
- As soon as the “Tap to add a description…,” prompt appears, enter a detailed description. It should feature the information your audience expects from the live video.
- Now, click on the “Go Live” button (red color camera icon). It’s situated at the bottom side of the screen. This will initiate your live stream.
Through PC
You can also upload live streams on a profile, page, or group through your PC. Keep note that all the live videos on Facebook pages are public. This means anyone can visit your page and see the content. Here’s how you can go live on the Facebook Business page through your PC
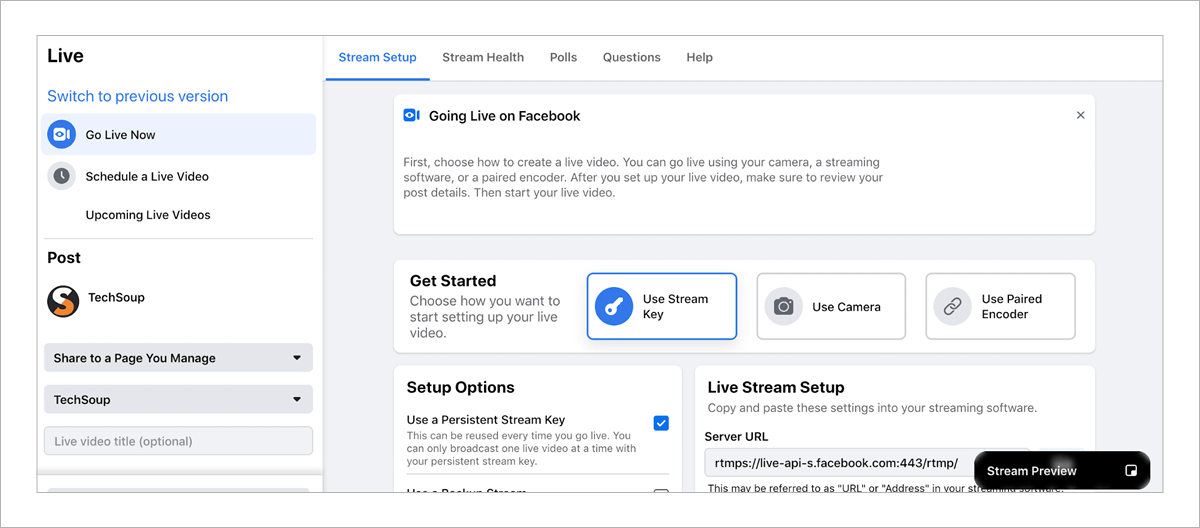
- First of all, go to your News Feed. On the left menu, click on Pages.
- Go to the page where you want to upload the live video and click on Live. It’s situated next to the Create option.
- Now, choose how you want to set up your live video. You can click on “Use Stream Keys” located beside the term “Get Started” (if you want the same). Select the Camera option to use a web camera for your live streaming.
- In the left menu, confirm if you want to Go Live now or Schedule a video for some other time.
- Make sure to input a description and title to the live video. If you want, you can check in to any location. You can also add any feeling or activity.
- On the bottom left side, click on the Go live option. That’s it! By following these steps, you can upload a live video on the Facebook business page through your PC.
Part 3: How to Go Live in a Facebook Group?
Other than that, you can go live in Facebook groups too. It’s an outstanding way to share the contents of any domain with a community of people with the same interest. Not only does it intrigue the group members, but it also attracts other followers or joinees to the group. Here, we will mention the process of going live in a Facebook group both through the Facebook mobile application and PC.
Through Facebook Mobile Application
At first, we will discuss the process of going live in a Facebook group through the Facebook mobile application. As mobile phones have become common, this is one of the most used methods for streaming live videos. Make sure to follow the below steps to go live in a Facebook group through a mobile application.
- Start by tapping on the top right side of your News Feed. Now, go to the Groups section and then tap on the “Your Groups” option.
- From there, choose the group where you want to go live. If you cannot see the Groups, tap on See more.
- Now, tap on the Live button. Make sure to enter the video description and input any effects (if you want to).
- After that, tap on the “Start Live Video” option. Make sure to familiarise yourself with the policies of Facebook before the streaming.
It’s possible to face a situation where you are unable to see the live option on your group. This can happen if the admin does not permit such posts in the group. However, if you are the group admin, permit the live option on your page.
Through PC
While Facebook mobile application is a popular medium to go live on Facebook groups, PCs are no exception. If you are an admin, there are chances that you are using Facebook through the system. To go live on a group through PC, follow the steps given below
- Go to your News Feed and look for an option called “Groups.” They are situated on the left menu.
- Now, choose the group where you want to live stream your video. From there, click on the “What’s on your mind?” option. Then, click on the “Live Video” button.


- You will get two options within the left menu, i.e., Go Live Now and Schedule Live Video Event. While the former ensures immediate streaming, the latter is for future streaming. Make sure to enter the time and date if you want your video to go live later.
- Make sure to enter the title and description into your live post. If you want, you can tag friends or members. You can also check in to the location or add any activity/feeling.
- On the bottom left side, click on the Go Live button.
Overall, that’s the process of how you can go live in the Facebook group through PC. If you are streaming gameplay, you can also tag a particular game title. For that, within the left menu scroll to the Gaming. Now, search for a game title and choose them as per your choice. Make sure to read all the policies and then move forward with the process.
If you’re planning to make live any pre-recorded video, you can create impressive videos using video editors. Wondershare Filmora is one such cool video editor using which you can create impressive videos for Facebook live. You can add a lot of interesting affects and features to make your videos engaging.
To Conclude
So, that’s the process of how you can create a live stream on Facebook. Pretty easy, right? Being a common social media platform, Facebook live stream ensures your content spreads to a full-fledged audience. No other source is as interactive as compared to live streaming. The best part about live video is that it suits all content types. So, whether you are an individual or brand, it’s going to work for you both ways. Hopefully, this guide helps you with live video streaming on Facebook.
In today’s time, live streaming has become quite popular for gamers and influencers. The reason behind it can be high interaction and engagement. One of the primary platforms to live stream your content is through Facebook.
It’s easy, quick, and connects with a mass of followers. However, if you do not know the process of how to go live on the Facebook page, then stay put. As in this guide, we will mention the correct steps. So, let’s begin:
In this article
Part 1: How to Schedule a Facebook Live?
Part 2: How to Go Live on Facebook Business Page?
Part 3: How to Go Live in a Facebook Group?
Part 1: How to Schedule a Facebook Live?
Scheduling a live video is where you plan a live stream on a particular time slot. Keep note that live video scheduling is only possible through a PC. You will also have to use the Google Chrome web browser for the same. Now that you know the pre-requisites, let’s comprehend the process in detail.
- To schedule a live video, click on the “What’s on your mind?” option. It’s situated just above the News Feed.
- Following that, click on the Live video option.
- Now, click on the “Schedule live video event” option. It’s present in the left column.
- Within the left column, choose the location where you want to stream your live video. You will get options like timeline, page, or group. If you want to upload a live video on your timeline, select the same. Likewise, for a group or page, select the options accordingly.
- Assign a name to the event. Also, choose other details like the date and time for your live streaming. After that, select the privacy setting for your live stream.
- Click on Next. To add pictures to your live video announcement, click on “Upload Cover Photo” or “Choose illustration”. Likewise, a default image will be selected if you do not want a special picture as your cover photo.
- Once done, click on the Create Event button. This is present on the bottom side of the left corner. Your live stream will be scheduled.
Once you schedule a live video, two posts will be generated automatically. This includes an announcement post and the live video post. The announcement post features all the information of the upcoming live stream. On the other hand, the live video post ensures that a live post is shared as per the scheduled date and time.
Part 2: How to Go Live on Facebook Business Page?
To ensure better connectivity and interaction with your followers, you may also require to go live through your Facebook business page. In that case, we will mention two ways to do so. While the first method involves live streaming through a Facebook mobile app, the second one includes live streaming through PC. Let’s check out both the process in detail:
Through Facebook Mobile App
Make sure you have downloaded the Facebook page mobile application to go live through your phone. For that, you can go to the App Store and search for the Facebook mobile application. Then, download and install the app.
- Go to the Business page and click on Publish. This is more or less similar to how you update your status.
- In doing so, the post window will launch. Look at the “Live Video” option situated at the bottom side. You can recognize it with the red camera icon.
- Once the Facebook permission prompts (for camera and microphone) appear, click on OK.
- As soon as the “Tap to add a description…,” prompt appears, enter a detailed description. It should feature the information your audience expects from the live video.
- Now, click on the “Go Live” button (red color camera icon). It’s situated at the bottom side of the screen. This will initiate your live stream.
Through PC
You can also upload live streams on a profile, page, or group through your PC. Keep note that all the live videos on Facebook pages are public. This means anyone can visit your page and see the content. Here’s how you can go live on the Facebook Business page through your PC
- First of all, go to your News Feed. On the left menu, click on Pages.
- Go to the page where you want to upload the live video and click on Live. It’s situated next to the Create option.
- Now, choose how you want to set up your live video. You can click on “Use Stream Keys” located beside the term “Get Started” (if you want the same). Select the Camera option to use a web camera for your live streaming.
- In the left menu, confirm if you want to Go Live now or Schedule a video for some other time.
- Make sure to input a description and title to the live video. If you want, you can check in to any location. You can also add any feeling or activity.
- On the bottom left side, click on the Go live option. That’s it! By following these steps, you can upload a live video on the Facebook business page through your PC.
Part 3: How to Go Live in a Facebook Group?
Other than that, you can go live in Facebook groups too. It’s an outstanding way to share the contents of any domain with a community of people with the same interest. Not only does it intrigue the group members, but it also attracts other followers or joinees to the group. Here, we will mention the process of going live in a Facebook group both through the Facebook mobile application and PC.
Through Facebook Mobile Application
At first, we will discuss the process of going live in a Facebook group through the Facebook mobile application. As mobile phones have become common, this is one of the most used methods for streaming live videos. Make sure to follow the below steps to go live in a Facebook group through a mobile application.
- Start by tapping on the top right side of your News Feed. Now, go to the Groups section and then tap on the “Your Groups” option.
- From there, choose the group where you want to go live. If you cannot see the Groups, tap on See more.
- Now, tap on the Live button. Make sure to enter the video description and input any effects (if you want to).
- After that, tap on the “Start Live Video” option. Make sure to familiarise yourself with the policies of Facebook before the streaming.
It’s possible to face a situation where you are unable to see the live option on your group. This can happen if the admin does not permit such posts in the group. However, if you are the group admin, permit the live option on your page.
Through PC
While Facebook mobile application is a popular medium to go live on Facebook groups, PCs are no exception. If you are an admin, there are chances that you are using Facebook through the system. To go live on a group through PC, follow the steps given below
- Go to your News Feed and look for an option called “Groups.” They are situated on the left menu.
- Now, choose the group where you want to live stream your video. From there, click on the “What’s on your mind?” option. Then, click on the “Live Video” button.
- You will get two options within the left menu, i.e., Go Live Now and Schedule Live Video Event. While the former ensures immediate streaming, the latter is for future streaming. Make sure to enter the time and date if you want your video to go live later.
- Make sure to enter the title and description into your live post. If you want, you can tag friends or members. You can also check in to the location or add any activity/feeling.
- On the bottom left side, click on the Go Live button.
Overall, that’s the process of how you can go live in the Facebook group through PC. If you are streaming gameplay, you can also tag a particular game title. For that, within the left menu scroll to the Gaming. Now, search for a game title and choose them as per your choice. Make sure to read all the policies and then move forward with the process.
If you’re planning to make live any pre-recorded video, you can create impressive videos using video editors. Wondershare Filmora is one such cool video editor using which you can create impressive videos for Facebook live. You can add a lot of interesting affects and features to make your videos engaging.
To Conclude
So, that’s the process of how you can create a live stream on Facebook. Pretty easy, right? Being a common social media platform, Facebook live stream ensures your content spreads to a full-fledged audience. No other source is as interactive as compared to live streaming. The best part about live video is that it suits all content types. So, whether you are an individual or brand, it’s going to work for you both ways. Hopefully, this guide helps you with live video streaming on Facebook.
Also read:
- [New] In 2024, Unseen Elements in Instagram Stories For the Curious Viewer
- 2024 Approved Best Practices for Creating Compelling Hash Tags on Facebook
- 2024 Approved Digital Distinction Design Molding an Animated Profile
- 2024 Approved Elevate Your Content on Facebook Using Wirecast
- 2024 Approved Facebook's Flash Video Frenzy
- 2024 Approved Secure Success in Win11 Meetings with Advanced Zooming Techniques
- 2024 Approved Spy on FB Chronicles, Unseen
- 2024 Approved The Insider's Tips for Sharing Videos on Instagram
- Amplify Your Social Impact with These Innovative FB Growth Tactics for 2024
- Essential Screen Recording Tools A Comprehensive Educator's Guide
- Guía Paso a Paso: Optimización Eficaz Del Tamaño De Vídeos AVI Sin Sacrificar Calidad en Sistemas Operativos Windows 10
- How To Remove or Bypass Knox Enrollment Service On Samsung Galaxy S24+
- In 2024, Social Media Streamlining IPhone/Android Tips for Effective Feeds
- In 2024, Unseen Navigators of FB Moments
- NVIDIA RTX 2070 Graphics Card Driver Update Now Available for Windows 10, 8 & 7 Users
- Pioneering Posts A Facebook Guide to Going Viral for 2024
- Reasons why Pokémon GPS does not Work On Motorola Moto G23? | Dr.fone
- Remove Google FRP Lock on Vivo Y36
- Techkey Bluetooth Compatibility and Driver Download Options for Windows 10, 7 & Annoyance
- Title: Transforming Passive Browsing Into Active Participation on FB
- Author: Robert
- Created at : 2024-11-06 06:29:09
- Updated at : 2024-11-11 08:11:06
- Link: https://facebook-video-content.techidaily.com/transforming-passive-browsing-into-active-participation-on-fb/
- License: This work is licensed under CC BY-NC-SA 4.0.